Project: Electronic Repair Management System In Php
Please scroll down and click on the download button to download the electronic repair management system project
This Electronic Repair Management System project is developed using PHP, CSS, HTML, and JavaScript. Talking about the project, it has all the essential features required for the management of the electronic shop. This project contains only the admin’s side where he/she can add, edit, delete, and view, electronic items for the user. The Admin plays the main role in the management of the system. In this project, all the main functions are performed from the Admin side.
About The System
This is a simple online electronic store management system in PHP. Here you can send your electronic items for repair. You can specify the problems with your gadget. Once you send your packet then they will repair your gadget.
Here all the tasks are handled from the admin part. From adding customers to checking their completion time. The admin has full access to the system. When you send your product for repair the admin will allocate it to the workers. If your item is repaired then the admin will mark it as to be delivered to the user. Also, the admin can check the product status. He can view the annual income or even the monthly income of his online electronic store. He can also manage the profits of the store.
To run this project you must have installed a virtual server i.e XAMPP on your pc (for Windows). This Electronic Repair Management System project in PHP with source code is free to download, Use for educational purposes only!
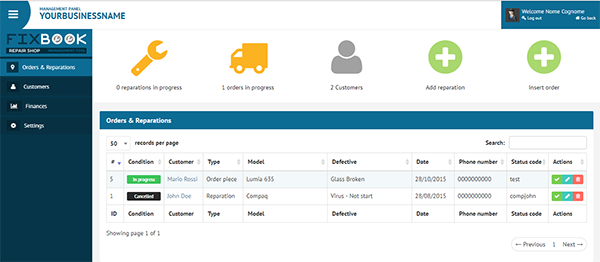
For the project demo, have a look at the image slider below.
How To Run??
After Starting Apache and MySQL in XAMPP, follow the following steps
1st Step: Extract file
2nd Step: Copy the main project folder
3rd Step: Paste in xampp/htdocs/
Now Connecting Database
4th Step: Open a browser and go to URL “http://localhost/phpmyadmin/”
5th Step: Then, click on databases tab
6th Step: Create database naming “dbfix” and then click on import tab
7th Step: Click on browse file and select “dbfix.sql” file which is inside “DATABASE” folder
8th Step: Click on go.
After Creating Database,
9th Step: Open a browser and go to URL “http://localhost/fix/”
Insert the username and password which is provided inside the “Readme.txt” file.

What is the admin email address and password?
stuck at: The requested URL /fix/login was not found on this server.
where is the documentation
I ‘ve created the database but when i run it i get the error
Filename: C:xampphtdocsfixitsystemdatabaseDB_driver.php
Line Number: 124
Folder “fix” is missing please check
it is the main folder that you get after downloading please check again
this project not running we asking fix/login.php how i am create fix then were is fix folder so give project demo to me
this project not running we asking fix/login.php how i am create fix then were is fix folder so give project demo to me.
Hello there,
How to add new currency?
Thanks
sir cannot start electronic source code
Hello, this page not loade, login not found, help me?
after i import the db,it show this
Deprecated: Optional parameter $level declared before required parameter $message is implicitly treated as a required parameter in C:\xampp\htdocs\fix\system\core\Common.php on line 350
I get this error Parse error: syntax error, unexpected token “…” in C:\xampp\htdocs\fix\system\libraries\Log.php on line 72