Project: Record Management System in PHP with source code
– To download Record Management System for free (scroll down)
About Project
Record Managment System is developed using PHP, CSS, and JavaScript. Talking about the project, it contains the least but essential features. This project contains an admin side where Admin can manage the transaction, offices, and document type. The Admin plays an important role in the management of the system. In this project, the user has to perform all the main functions from the Admin side.
About System
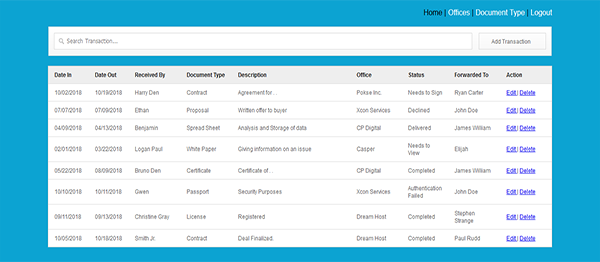
The Admin has full control of the system, all the functions are to be performed from Admin panel. Here, the admin can manage transactions easily. In order to add transactions, the user has to enter the date in, date out, receiver name, select document type, description, select office, status and name of the person to whom it is forwarded. It can store various offices so the user can also add offices just by providing a name. Adding document types are also similar to adding offices which are done by inserting a name. In short, this project is based on CRUD functions.
The system displays all the transaction records inside the home page, in a clean and responsive way. Design of this project is pretty simple so that the user won’t find any difficulties while working on it. Record Management System in PHP helps in easy management of records on the various transactions of official works. To run this project you must have installed virtual server i.e XAMPP on your PC (for Windows). Record Management System in PHP with source code is free to download, Use for educational purposes only! For the project demo, have a look at the image slider below.
Features:
- Login system
- CRUD Transactions
- Add Offices
- Add Document Types
How To Run??
After Starting Apache and MySQL in XAMPP, follow the following steps
1st Step: Extract file
2nd Step: Copy the main project folder
3rd Step: Paste in xampp/htdocs/
Now Connecting Database
4th Step: Open a browser and go to URL “http://localhost/phpmyadmin/”
5th Step: Then, click on the databases tab
6th Step: Create a database naming “record” and then click on the import tab
7th Step: Click on browse file and select “record.sql” file which is inside “DATABASE” folder
8th Step: Click on go.
After Creating Database,
9th Step: Open a browser and go to URL “http://localhost/recordmanagement/”
Insert the username and password which is provided inside the “Readme.txt” file.
Project Demo
LOGIN DETAILS ARE PROVIDED IN “Readme.txt” FILE INSIDE THE PROJECT FOLDER
DOWNLOAD RECORD MANAGEMENT SYSTEM IN PHP WITH SOURCE CODE: CLICK THE BUTTON BELOW
[quads id=1]


Dear Respected Sir,
I would like to say Thanks to Argi Policarpio for provided this project.
And My Query is how to create 2 logins that is one is for “admin” and other is for “user”.
1.Whenever we logins to “admin” it should have all access.For example the “admin” can Add Transacation,Edit,Search,and
delete the record.
2.If we logins to “user” it should have only acess for Adding transaction option.For example the “user” added transction
should be reflected on the “admin” account as well as database.
So can you please kindly suggest me how to write this code for this project.
for that, you have to create an admin panel, make a connection with user’s side and a separate row in the database.
I can’t open the database. when I open the “http:/localhost/recordmanagement”, it says:
Object not found!
The requested URL was not found on this server. If you entered the URL manually please check your spelling and try again.
If you think this is a server error, please contact the webmaster.
Error 404
localhost
Apache/2.4.41 (Win64) OpenSSL/1.0.2s PHP/7.1.32
——
What should I do?
Thank you so much!!!. Great work!!!
Hi! when I click the add transaction button it doesn’t show the UI to add a transaction how do I fix that?
Project
Date of birth certificate in BCA project
I’m using php 8.2
After configuring everything, it is showing
Fatal error: Uncaught PDOException: SQLSTATE[42S22]: Column not found: 1054 Unknown column ‘password’ in ‘where clause’ in C:\xampp\htdocs\nama\login.php:32 Stack trace: #0 C:\xampp\htdocs\nama\login.php(32): PDOStatement->execute() #1 {main} thrown in C:\xampp\htdocs\nama\login.php on line 32